
In this post, I'll dicuss how I was able to quickly and inexpensively replace the thermal fuse on our Breville digital toaster oven. There were a few scattered forum posts from which I pieced together this information, even though this appears to be a common issue, and applies to the following conditions:
- You own a Breville Smart Oven that's out of warranty (or don't want to deal with the weeks of delay in getting a warranty replacement)
- Your oven is completely 'dead', with no display characters appearing when you plug it in or press the buttons.
- Your outlet is working properly (reset any GFCI or breakers) and you have verified other appliances work fine with the outlet you are using for the toaster oven.
Note
Disclaimer! Please use the how-to below at your own risk. Although the fix is fairly straight-forward for anyone with a technical/DIY/engineering background, you are dealing with line voltages and a high temperature appliance. I cannot accept any responsibility for loss or damage resulting from your use or misuse of this information.
1 Background
A little more than 4 months after our purchase, with light duty of ~2-3 cycles of toasting bread every day, the Breville just refused to power on one day. After verifying there was no cord/outlet issue, I did some google searches and discovered that this is in fact a common issue. It appears that the thermal fuse, which is used to cut-off power when the oven gets too hot, needed replacing. I'm not sure why the fuse would blow, since my oven had plenty of space around it and I did not bake at high temperatures for a prolonged period of time, but this seemed like a common failure mode.
The relatively simple fix is detailed in the next section, and is based on this post where someone replaced the 650XL fuse
2 Fixing the fuse
2.1 Tools requireed
- Philips screwdriver
- Wire cutters
- Plastic pry tool
- Crimp tool (best) or needle-nose pliers (acceptable)
- Crimp terminals
- Digital multimeter or continuity checker (nice-to-have)
2.2 Replacement fuse
There are two options to getting a replacement part:
Get the entire fuse assembly (basically a long wire with a heat-resistant wrap, plus a thermal fuse and mounting bracket) for ~$5 plus shipping:
Avoid the long lead times, and just buy the thermal fuse at Radio Shack or Amazon.com:
Radio Shack - 443F 10A-rated fuse.
The latter is an exact temperature replacement for the 420F fuse in my 450XL, while the former is a slightly higher temperature one. I went with the 443F one from Radio Shack because I wanted a little bit of headroom on fusing it next time, and I could buy this in the store. You will also need some crimp terminals.
 Metal TF 216 Celsius Cutoff Fuse
2.3 Replacement procedure
2.3.1 Remove screws
Make sure your oven is unplugged, place it front panel down on a counter, so you can get easy access to the screws in the back. Remove all of them ~2 dozen, as shown in the picture below:

Next, remove all the screws on the bottom feet of the oven, as well as two screws on the bottom sides. (sorry, no picture here) Remove the plastic feet from the front. I could not figure out a way to remove the rear feet as there appeared to be a rivet holding them in place, but YMMV.
2.3.2 Pry open back panel
Slowly slide the back panel down and to the right, without snapping off the feet in the process (maybe there's a better way to do this, but all you need is access to the left side of the oven where the power cord goes into the fuse).

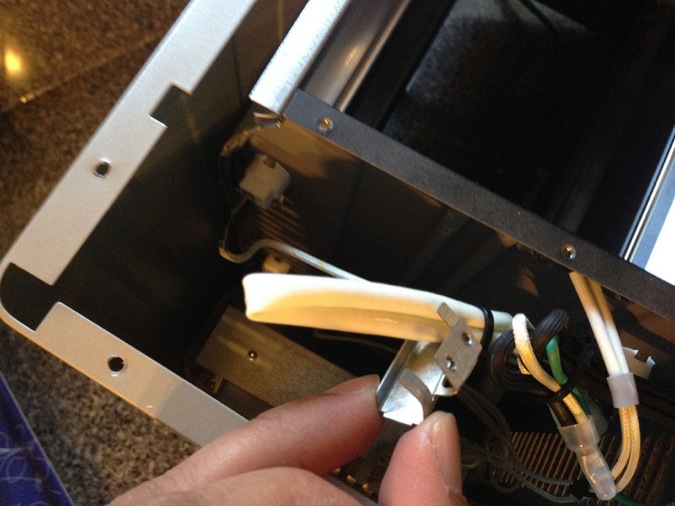
2.3.3 Disassemble fuse assembly bracket
The white assembly is on the left side, and you'll need to remove two phillips screws to disengage from the inner oven wall. Pull it out of the bracket as shown below:
At this point, it's probably a good idea to use a multi-meter and test for lack of continuity across the two ends of the wired assembly, to verify that the fuse is in fact blown.
Now, you can either replace this entire assembly if you went that route, or replace just the fuse in the next section.
2.3.4 Replace fuse in assembly
If you slide back the white plastic sheath, you'll see the thermal fuse underneath:

Now, just cut off the old fuse with the crimp connectors on either side, making sure to remember which side is marked black, and connect your new fuse with new uninsulated crimp terminals. Roll back the sheath over the fuse, place it back in the bracket, re-attach the bracket, and rescrew the back panel
You're done!